
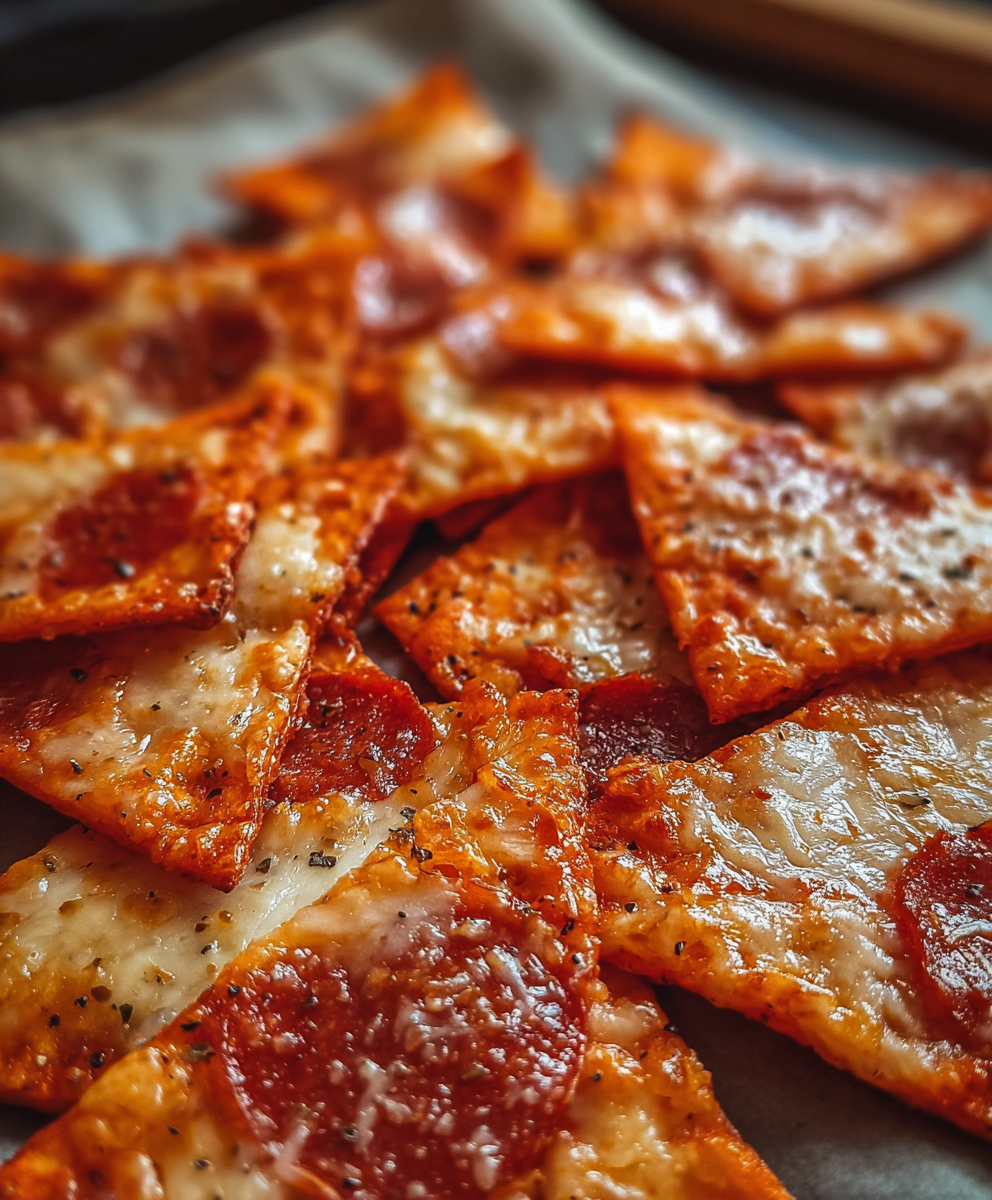
Crispy Pizza Chips

Crunchy, bite-sized tortilla chips topped with pizza sauce, melted mozzarella and your favorite toppings — a fast, shareable snack that tastes like pizza in every crisp bite.

This simple, crunchy snack became my go-to for busy evenings and impromptu gatherings. I first made these with corn tortillas during a movie night when I wanted something faster than delivery but more exciting than plain chips. The combination of a thin, slightly roasted tortilla, a smear of thick pizza sauce, and a blanket of bubbling mozzarella produced an irresistible crunch and melty bite. It felt like pizza had been distilled down to its happiest components: crispness, sauce, cheese and a little spice. Family and friends kept coming back to the tray — the platter emptied faster than I could refill it.
I love how adaptable these are. On a rainy afternoon I swap in roasted bell peppers and olives for a lighter topping; on game day I layer pepperoni and a sprinkle of Parmesan. The texture is what sells it: choose corn for a classic, sturdy crunch or flour for a tender, foldable bite. They require very little hands-on time and are forgiving if you need to pause between steps. They’ve saved more than one last-minute dinner and turned ordinary leftover tortillas into something celebratory. This version keeps measurements simple and kitchen-friendly: 4 tortillas, 1 cup pizza sauce, 1 cup shredded mozzarella and 1 cup of your favorite toppings, finished with Italian herbs, garlic powder and a pinch of crushed red pepper.
Why You'll Love This Recipe
- Ready in about 20 minutes from start to finish — perfect for snack time or a last-minute appetizer.
- Uses pantry staples: tortillas, jarred pizza sauce and shredded cheese, so you can pull it together without a special trip to the store.
- Customizable to any diet: swap toppings to accommodate vegetarians, meat lovers or those avoiding gluten by choosing certified corn tortillas.
- Perfect for crowds — scale up easily and keep trays warm in a low oven while you prepare more batches.
- Crunchy texture retained by using a slightly thicker pizza sauce and a quick high-heat finish in the oven or air fryer.
- Great for leftover tortillas and as a kid-friendly way to introduce toppings; adults can turn up the heat with crushed red pepper or fennel pollen.
Personally, the first time I served these at a family gathering everyone mistook them for a restaurant appetizer. Small kids loved picking their own toppings, while the grown-ups appreciated that the chips stayed crisp even after a few minutes on the platter. I learned to pre-slice the tortillas into wedges before adding anything — it speeds assembly and ensures every chip has the right balance of sauce and cheese.
Ingredients
- Tortillas (4): Use 6-inch corn or flour tortillas. Corn tortillas give a drier, chip-like crunch while flour yields a slightly chewier bite. I use Mission or La Tortilla Factory for consistent thickness; store-bought white corn tortillas labeled "masa harina" are best for flat crisping.
- Pizza Sauce (1 cup): Choose a thicker marinara or pizza sauce such as Rao's or Newman's Own for less sogginess. If your sauce is thin, simmer it 5 minutes to reduce moisture — that small step keeps chips crisp longer.
- Shredded Mozzarella (1 cup): Whole-milk mozzarella melts more uniformly and browns beautifully. Fresh mozzarella is delicious but releases more moisture; reserve fresh for a last-minute finish if you like a softer cheese texture.
- Toppings (1 cup): Customize with sliced pepperoni, diced bell peppers, sliced olives, or thinly sliced mushrooms. Pre-cooked, thinly sliced meats work best so nothing needs extra cooking time.
- Italian Herbs (1 teaspoon): A dried blend of basil, oregano and thyme brightens flavors; sprinkle before baking so the herbs toast slightly and release aroma.
- Garlic Powder (1 teaspoon): Adds warm, nutty depth without the risk of burning that minced garlic brings.
- Crushed Red Pepper Flakes (1/2 teaspoon): Optional; adjust to taste for a spicy kick. Add half before baking and more after for layered heat.
Instructions
Prepare the tortillas: Preheat oven to 400 degrees F or preheat the air fryer to 375 degrees F. Stack the tortillas and slice each into 6 wedges with a sharp knife or pizza cutter, creating 24 chips total. Laying them flat and cutting before adding toppings ensures quick, even toasting and makes assembly faster. Arrange and season: Place wedges on a parchment-lined baking sheet in a single layer with a centimeter or two between pieces, or arrange similarly in a single air fryer basket without overlap. Lightly brush or spray the tops with neutral oil if you want extra golden color (optional). Sprinkle half of the garlic powder evenly over the chips so every wedge has a hint of savory aroma. Spread the sauce: Spoon about 1 tablespoon of sauce onto each wedge, spreading thinly with the back of the spoon. Use thicker sauce and a thin layer so the chips do not become soggy; aim for a glossy, even smear rather than a puddle. Add cheese and toppings: Scatter shredded mozzarella evenly across the chips, then top with small pieces of your chosen toppings so every bite has balance. Finish with Italian herbs and the remaining garlic powder plus a light sprinkle of crushed red pepper flakes. Smaller pieces prevent heavy, floppy chips. Bake or air-fry until crisp: For oven method, bake on the center rack at 400 degrees F for 6 to 9 minutes until cheese is melted and edges are golden. For air fryer, cook at 375 degrees F for 4 to 6 minutes checking at 3 minutes; air fryers vary, and you want the cheese set and edges crisp, not burnt. Visual cues: edges should be lightly browned and cheese bubbling. Cool then serve: Let chips rest 2 minutes on the sheet or rack; cooling firms them and prevents topping slippage. Transfer to a serving platter and offer extra sauce for dipping. If stacking, separate layers with parchment to keep them crunchy.
You Must Know
- These hold well for about 2 hours at room temperature; store in an airtight container for up to 24 hours, but expect slight loss of crispness.
- They freeze poorly once assembled because cheese and sauce change texture upon thawing; freeze plain toasted chips and re-top when reheating for best results.
- High heat is the key: 400 degrees F in the oven or a short burst in the air fryer gives crisp edges without overcooking toppings.
- Use thicker, low-moisture sauce and whole-milk shredded mozzarella to balance moisture and browning for ideal texture.
I love that these are both a comfort snack and a clever use of pantry ingredients. One evening I made a double batch for a family reunion — the platter cleared within minutes. Over time I learned to keep toppings small and sauce sparse; that little discipline guarantees every bite is crisp and flavorful. The simplicity is what keeps me coming back: fast, forgiving and endlessly customizable.
Storage Tips
Store cooled chips in an airtight container at room temperature for up to 24 hours to preserve crispness. If you need to keep them longer, separate chips from toppings: toast plain tortilla wedges, cool completely, and freeze in a single layer on a tray before transferring to a freezer bag for up to 3 months. Reheat frozen plain chips in a 400 degrees F oven for 4 to 6 minutes, then add sauce, cheese and toppings and finish under the broiler briefly to melt without sogginess. Avoid refrigerating assembled chips — cold storage makes the tortilla limp.
Ingredient Substitutions
For a dairy-free version, use a plant-based shredded cheese such as a cashew-based mozzarella alternative and select a dairy-free pizza sauce. To make gluten-free chips choose certified gluten-free corn tortillas and verify that any processed toppings are gluten-free. Swap mozzarella for provolone or a mix of mozzarella and sharp cheddar for deeper flavor; reduce cheddar to half the amount so meltability remains excellent. If you prefer less sodium, choose low-salt pizza sauce and rinse brined toppings like olives to reduce salinity.
Serving Suggestions
Serve on a large platter garnished with fresh basil leaves and a drizzle of good extra-virgin olive oil for an elevated finish. Pair with small bowls of extra marinara, ranch or garlic aioli for dipping. These are great alongside a simple green salad for a light dinner or as part of a sharing board with roasted vegetables, cured meats and pickles for a party. For a kid-friendly presentation, set out toppings and let guests assemble before a final quick bake.
Cultural Background
These crisps are a playful riff on pizza, inspired by the long tradition of turning flatbreads into portable snacks. Tortilla chips fused with pizza toppings reflect a cross-cultural creativity popular in casual American cooking — where Italian-American flavors meet tortilla-based crisps. They follow the same spirit as pizza bagels and pizza rolls: transforming familiar flavors into new, easy-to-share forms. Regional variations in the United States have embraced such hybrids, especially for game-day snacks and quick party hors d'oeuvres.
Seasonal Adaptations
In summer, load chips with thinly sliced cherry tomatoes, fresh basil and a sprinkle of grated Parmesan after baking for a bright, caprese-inspired bite. In winter, swap fresh toppings for roasted root vegetables and a drizzle of balsamic reduction for deeper flavors. During the holidays add roasted butternut squash and sage or use spicy Italian sausage and caramelized onions for a heartier seasonal version. Adjust bake times slightly for wetter toppings to ensure the base stays crisp.
Meal Prep Tips
For make-ahead convenience, toast plain tortilla wedges and store them airtight at room temperature for up to 2 days. When ready to serve, top and bake for 6 to 8 minutes. This saves assembly time on busy evenings and helps maintain crispness. If preparing for a party, arrange finished chips on several baking sheets and keep warm at 200 degrees F for up to 20 minutes, spacing chips so steam can escape. Use parchment between layers when stacking to prevent sticking.
These crisps are the kind of recipe that invites improvisation. Whether you keep it classic with pepperoni and cheese or experiment with seasonal toppings, the result is always a crunchy, shareable snack that feels like pizza in miniature. Give them a try next time you want something fast, fun and impossible to stop eating.
Pro Tips
Slice tortillas into wedges before topping to speed assembly and ensure even coverage on each chip.
Use a thicker pizza sauce or simmer a thin sauce briefly to reduce moisture and keep chips crisp.
Toast plain tortilla wedges ahead of time and top only when ready to serve to prevent sogginess.
Spread toppings thinly and use small pieces to avoid weighing down chips and losing crunch.
This nourishing crispy pizza chips recipe is sure to be a staple in your kitchen. Enjoy every moist, high protein slice — it is perfect for breakfast or as a wholesome snack any time.
FAQs about Recipes
Can I make these gluten-free?
Yes. Use certified gluten-free corn tortillas and verify toppings are gluten-free. Avoid flour tortillas if you need strict gluten avoidance.
How long do leftovers keep?
They store best at room temperature in an airtight container for up to 24 hours. Reheat in a 400°F oven for a few minutes to restore crispness.
Tags
Crispy Pizza Chips
This Crispy Pizza Chips recipe makes perfectly juicy, tender, and flavorful steak every time! Serve with potatoes and a side salad for an unforgettable dinner in under 30 minutes.
Ingredients
Chips
Toppings
Seasoning
Instructions
Preheat and slice
Preheat oven to 400°F or air fryer to 375°F. Stack tortillas and slice each into 6 wedges to make approximately 24 chips total. Cutting before topping ensures even toasting and faster assembly.
Arrange and season
Place wedges in a single layer on parchment-lined baking sheet or air fryer basket. Optionally brush lightly with oil. Sprinkle half the garlic powder evenly so every wedge has a hint of aroma.
Sauce the chips
Spoon about 1 tablespoon of thick pizza sauce onto each wedge and spread thinly. Use a thin, even layer to avoid soggy chips.
Add cheese and toppings
Distribute shredded mozzarella evenly and add small pieces of chosen toppings so each chip is balanced. Finish with Italian herbs and remaining garlic powder and red pepper flakes if using.
Bake or air-fry
Bake at 400°F for 6 to 9 minutes until edges brown and cheese bubbles. In an air fryer, cook at 375°F for 4 to 6 minutes, checking early. Visual cues: lightly browned edges and melted cheese.
Cool and serve
Allow chips to rest 1 to 2 minutes to firm up. Transfer to a platter and serve with extra sauce for dipping. Store leftovers in an airtight container at room temperature up to 24 hours.
Last Step: Please leave a rating and comment letting us know how you liked this recipe! This helps our business to thrive and continue providing free, high-quality recipes for you.
Nutrition
Did You Make This?
Leave a comment & rating below or tag
@yummyhues on social media!
Categories:
You might also like...
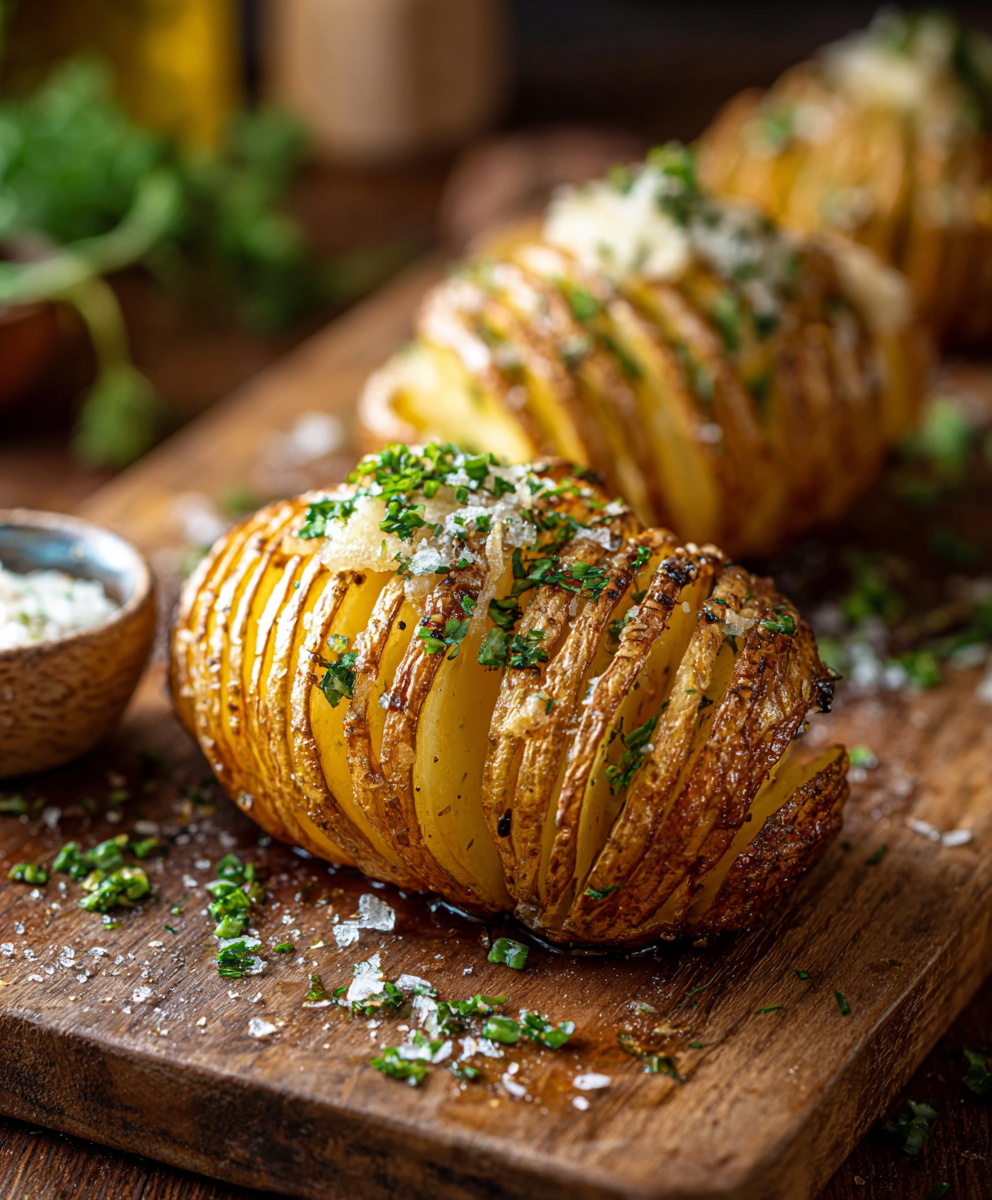
Crispy Hasselback Potatoes
Thinly sliced russet potatoes brushed with butter and baked until the edges are crisp and the centers are tender.
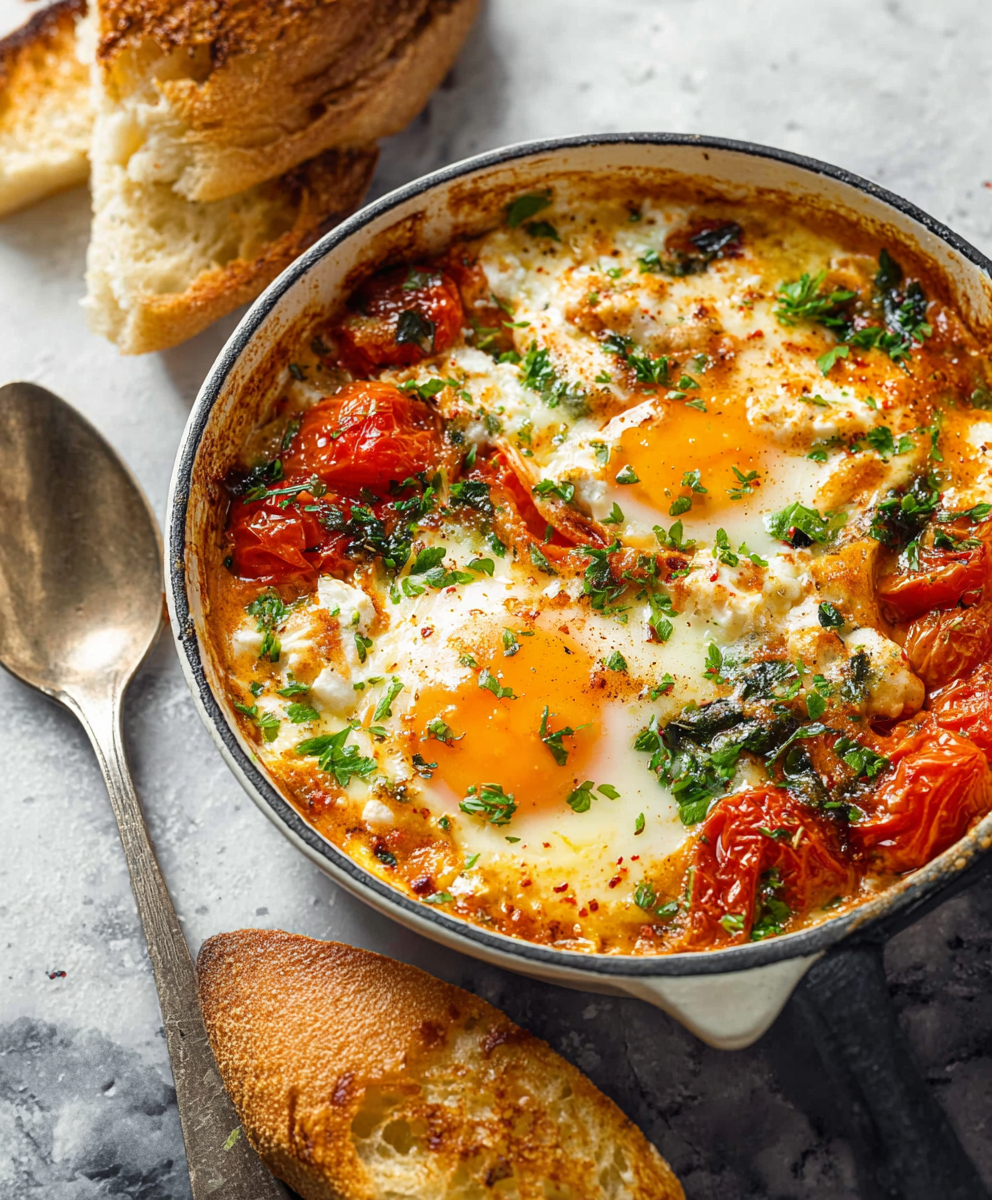
Baked Feta Eggs with Roasted Tomatoes and Spinach
A simple, vibrant baked egg dish: tangy feta melting into roasted cherry tomatoes with spinach and fragrant herbs. Perfect for brunch or an easy dinner.
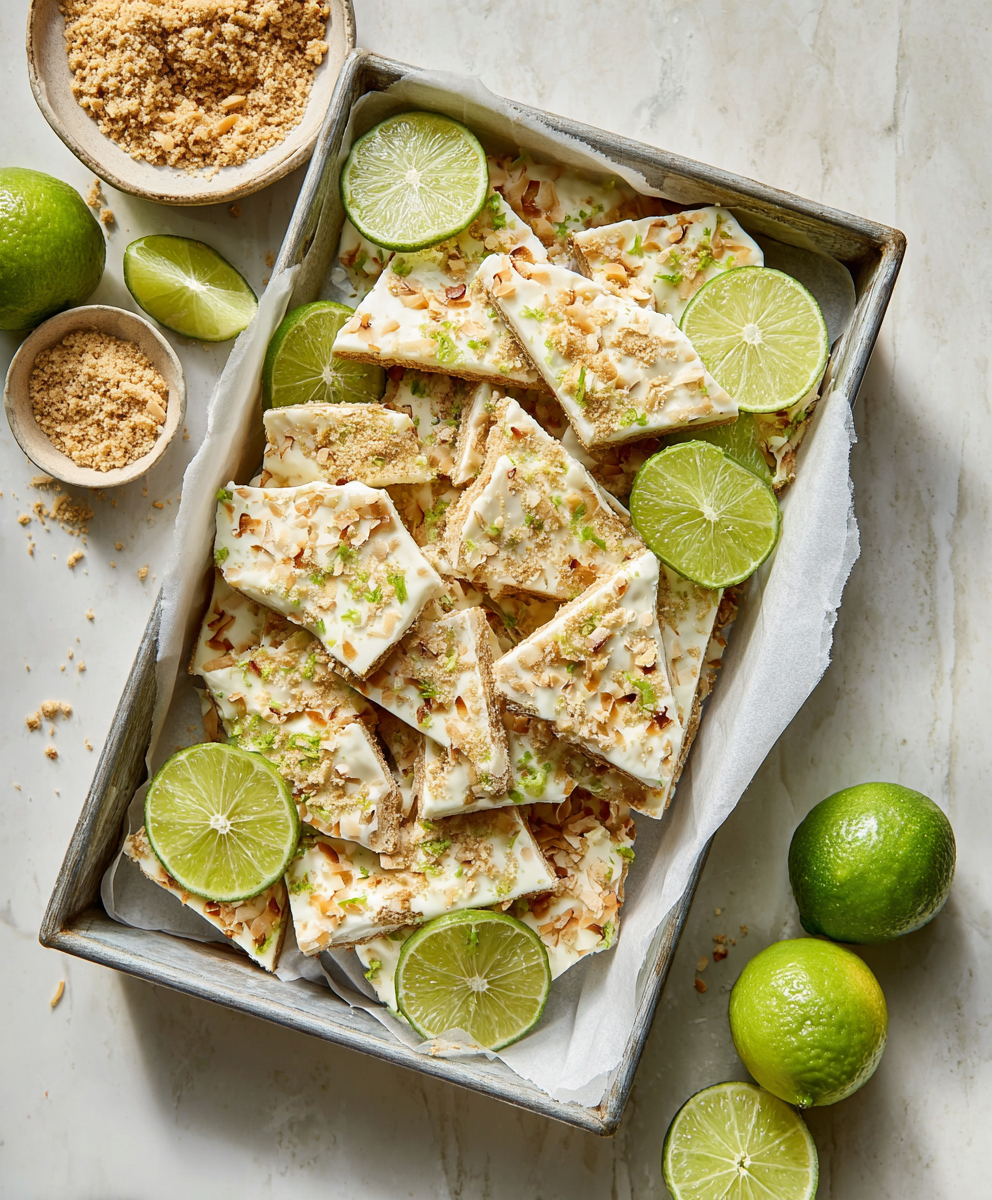
Key Lime Pie Yogurt Bark
A bright, tangy frozen treat that tastes like mini key lime pies. Creamy Greek yogurt, fresh lime, crunchy gluten-free crumbs, and toasted coconut come together for a protein-packed snack.
Did You Make This?
Leave a comment & rating below or tag @yummyhues on social media!
Rate This Recipe
Share This Recipe
Enjoyed this recipe? Share it with friends and family, and don't forget to leave a review!
Comments (1)
This recipe looks amazing! Can't wait to try it.
Comments are stored locally in your browser. Server comments are displayed alongside your local comments.

Hi, I'm Chloe!
What's Popular
30-Minute Meals!
Join to receive our email series which contains a round-up of some of our quick and easy family favorite recipes.